When printing our designs correctly, we must add a safety margin on each side to prevent clipping on the background, images, or other problems with the final format.
This safety area is usually known as the printing or imprint bleeding area.
Sending a final file to the printer without bleeding can bring inconvenience to the final result, moreover, it complicates the work of the printer by slowing down the printing process.
For this reason, it is essential to know how many mm of edge we should leave and how we can apply the bleeding property to our designs.
Let’s get started!
What is the printing bleeding area?
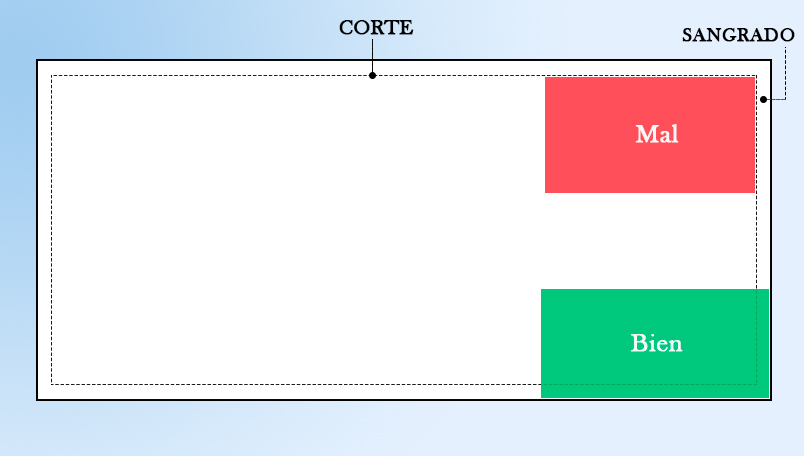
The printing bleeding area is a safety margin that must be added to any design before it is sent to print. By extending a few mm from the edge to the size of the design, you prevent the guillotine from leaving white edges when you make the cut.
Whether you prefer to order your print from a traditional or online printing shop, the bleed area will vary depending on the type of product and material the print shop uses.
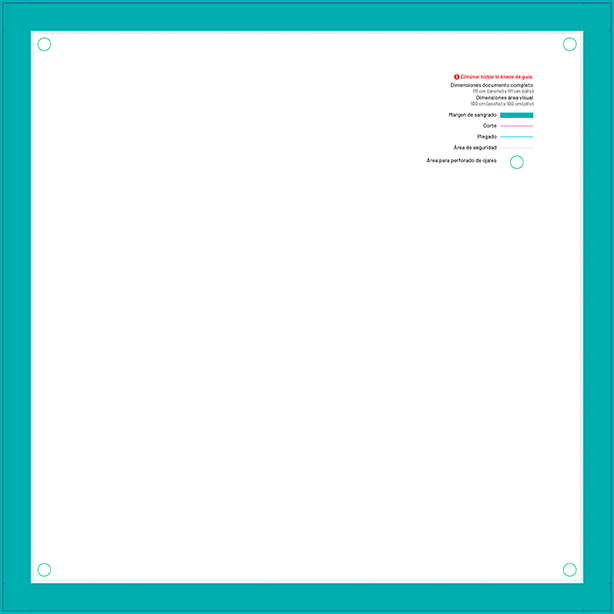
In this case, let’s see the bleeding to print advertising banners.
Specifically, we are faced with a printed banner on which polycarbonate grommets will be applied at the four corners.
Therefore, bleed printing is the whole part painted in blue as indicated in the document.
Why is bleed printing so important for a printing press?
In the world of graphic arts, the printing bleeding area is crucial for virtually all paper print products, be they canvas, business cards, presentation folders, and all types of advertising banners.
Although technological advances have significantly improved the accuracy of guillotines, it is not always possible to achieve a perfect cut.
Establishing a safety margin is essential, as it will ensure that we get a line-free print in the final format, avoiding design cuts or text when printing.
Do all print jobs need a printing bleeding area?
Only prints containing design elements that reach the edges of the page require indentation.
For example, color backgrounds and images while white background designs don’t have to worry about bleeding.
This can be seen especially in books since their inner pages usually have a white background, so they don’t require indentation and don’t need to increase the size of the document to get a good impression.
But if we go to the cover of the book then the bleeding may be important if it contains colored backgrounds or images that reach the edge, being necessary to add a bleed to avoid cropped images and white lines on the edge.
What should the bleed printing measure?
The sizes vary depending on the design and the finish you are looking for, it would be best to contact the printing press where you want to print your design to get an excellent result.
It is usual to leave between 2 and 3 mm away on digital or offset prints. For large format printing it is advisable to leave a measurement of 5mm off the edge and if you work with die cutting it is necessary to have a margin of 5 mm to 10mm.
Here’s an example of how the print bleed margin is going to depend on the finish you need and the project.
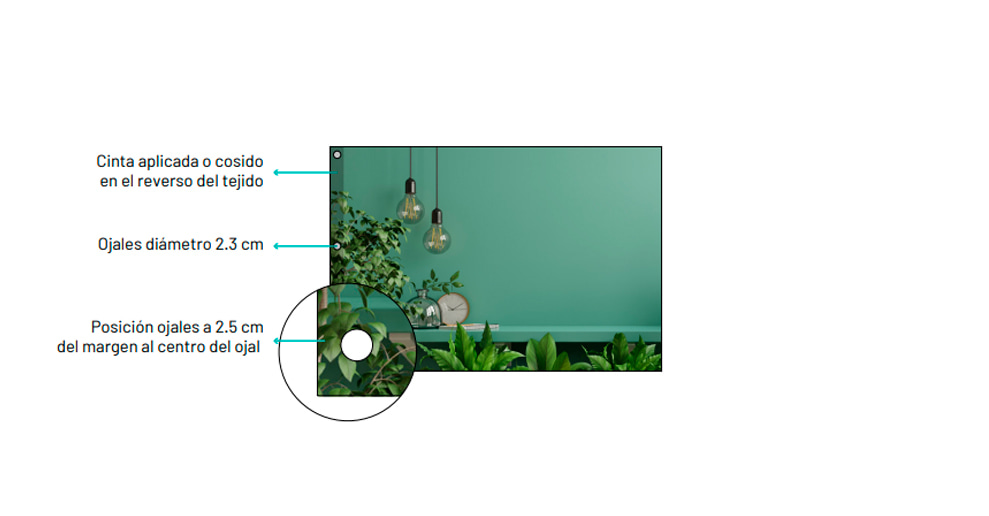
The margin to be taken into account for banners with eyelets is as follows:
How to add bleed printing to send to the printer?
The indentation can be added using the indentation options within the file settings.
Let’s see how to add a printing bleeding area to the most used paid and free graphic design programs:
Indesign bleeding
In Indesign, we will start by going to “File”> “New” > “Document” where we will find several sections to indicate the margins of the file, the size, and other parameters, then, at the end we will see the option “Bleeding and annotations”, right here we can indicate that we want to leave a margin of 3mm.
In case you have already created your project, and you just want to add InDesign indentation, go to “File” > “Adjust Document” and enter the 3 mm margin in the indentation box.
Bleeding on Illustrator
In Illustrator, if we want to make a new layout with Illustrator indentation, we must go to “File”> “New. ” Next, we enter the size of the document and place the 3 mm indentation on each side in the indentation fields.
If you have already created the file and only want to add the indentation, go to “File”> “Adjust Document” and add the 3 mm edge in the indentation section.
Once we add the indentation, we will see a red line around the document that will tell you how far you should stretch the images and backgrounds.
PhotoShop Bleeding
PhotoShop is a program designed to create illustrations and retouch images, it also serves to add bleeding to a project. To do this you must create a file expanding the measurements on each side by 3mm.
For example, if you are going to design a brochure with size A5 (148 x210), ideally you would create a document of:
Height: 3 mm + 3 mm + 148 mm base = 154 mm of final size.
Width: 3 mm + 3 mm + 210 mm base = 216 mm of final size.
If you have previously created the document, you can perform the indentation in
PhotoShop by enlarging the canvas size. To do this, go to “Image” > “Canvas Size” and add 6 mm in both the height and width of the document.
In this way, you have successfully added 3 mm of margin to each side of the design.
Make sure you don’t enlarge the image but expand the space on the sides so you can set the right cut lines so that guillotine can cut the design without cropping the image or leaving white edges.
Conclusion
Defining print bleed is a really simple step, however, it is of great importance when making professional print products with a good finish and high quality.
It is essential not to forget this area in our printed designs. This is the only way to make the printing
It is essential not to forget this area in our printed designs. This is the only way to make the printing process easier and achieve a good result on brochures, tarpaulins, business cards, and canvases.
Do you know the importance of imprint bleeding? Have you applied this safety margin to your designs yet?
Leave us a comment telling us your experience!
Share it at your Social Networks
You may also like...
No Comments in Printing bleeding area: What is it and why is it important to adjust it properly before sending it to the printing press?
Sorry, comments are closed...